Lego Challenge team-building activity: unlock lasting learning
Published
13 August 2021
Updated
18 December 2025

Written by
Jamie Thompson
Head Facilitator and Managing Director at MTa Learning
If you’ve been involved in running team building events you’ve probably seen the Lego Challenge. It's a simple and fun Lego team building activity, popular with facilitators looking to build and develop teams.
But without proper facilitation, there are limitations on what the activity can achieve. In this blog post we give step-by-step instructions for running the Lego Challenge in a way that transforms it from a fun activity into a meaningful team building development tool.
Here’s what we’ll cover:
Get your free Lego Challenge facilitator resources - in your inbox in 30 seconds ⏱️
Lego Challenge team building activity at a glance
Lego Challenge team building activity instructions (step-by-step)
Which Models to use for the Lego Challenge (Lego Chicken, Lego Plumber, Lego Hedgehog)
Alternative Lego Team building activities (icebreaker, quick, remote, creative, competitive)
Alternative team building activities (experiential learning kits & activities, Egg Drop Challenge, Paper Bridge Challenge, Marshmallow Challenge)
Further reading
Get FREE Lego Challenge facilitator resources - in your inbox in 30 seconds ⏱️
Lego Challenge Team Building Activity At A Glance
The goal: each team has to build a model as close to a provided schematic as possible
The twist: only one member of the team has seen the schematic, and they’re not allowed anywhere near the building table
The process: a Lead Builder relays instructions from the Lead Designer to the Builders, who must build the model
The potential learning objectives: clear and concise communication, active listening, visualising instructions, relaying instructions, problem solving
The limitations: using ‘default’ instructions only creates raw material that doesn’t translate to lasting learning
The value of running the activity properly: structured review and a repeat attempt transforms a fun activity into a meaningful team building tool
The role of the facilitator: guide teams through structured review while helping participants surface behaviours, test alternatives, and connect insights to real workplace situations
For instructions on how to facilitate the Lego Challenge team building activity properly, read on.
The Lego Challenge instructions (step-by-step)
Time taken: 30-60 minutes
Group size: 3+ groups of 5-6
Difficulty: medium
Here are instructions on how to facilitate the Lego Challenge team building activity properly, transforming it from a fun activity to a meaningful team building tool.
Download your Lego Challenge team building activity resources - facilitator instructions, slide deck to brief teams & participant review worksheets
Gather your materials
Brief participants and split each team out into roles (Lead Designer, Lead Builder or Builders)
Separate Lead Designers from their teams, give them each a schematic
Let Builders get their Lego
Retrieve the schematics from the Lead Designers
Begin the activity
Score the models
Structured review
Repeat the activity
Step 1: Download your resources
You can run the activity without them, but we highly recommend downloading your Lego Challenge resources here.
Step 2: Gather your materials
You need:
Lego: at least 30 pieces per team
A diagram of the model your teams will be building: enough copies for one per team
A timer
Some space on a flat surface: table, floor, etc
Step 3: Brief participants and split them out into roles
For best results use teams of 5, although the challenge works with as little as 3.
Each team needs the following roles:
| See schematic | Talk to Lead Designer | Talk to Lead Builder | Talk to Builders | Touch Lego |
Lead Designer x1 | ✅ | N/A | ✅ | ❌ | ❌ |
Lead Builder x1 | ❌ | ✅ | N/A | ✅ | ❌ |
Builders | ❌ | ❌ | ✅ | ✅ | ✅ |
Step 4: Separate Lead Designers from their teams, give them each a schematic
Each Lead Designer has 30 seconds to look at the schematic and memorise it in as much detail as possible. They MAY NOT draw anything or take any photos.
Lead Designers stay in their own location, referred to as the HQ.
Step 5: Let Builders get their Lego
Builders can choose 18 bricks from the central Lego store, also called the Warehouse. The Lead Builder CAN be present in the initial phase, but CANNOT touch Lego.
Step 6: Retrieve the schematics from the Lead Designers
After 30 seconds, collect the schematics from the Lead Designers.
Step 7: Begin the activity
Set a 20-minute timer. During the activity, the Lead Builder may move between the HQ (where the Lead Designer is) and the Factory (where the Builders are).
The Lead Builder can talk to the Lead Designer as many times as necessary without incurring a penalty
The Lead Designer must remain in the HQ
The Lead Designer may request to view the schematic again: each 30 second viewing incurs a one point penalty
The Builders may visit the Warehouse as many times as they like and swap as many Lego pieces as they like each time. Each visit incurs a one point penalty
Step 8: Score the models
Once the 20-minute timer runs down, all teams must stop building. At this point you review the completed models and decide the winner.
The closest model to the schematic receives 2 points. The next closest receives 4 points, and so on.
Add penalty points for any extra views of the schematics or visits to the Warehouse.
The lowest scoring team wins.
Step 9: Structured review
The activity itself only creates raw material. Lasting learning happens when participants reflect on what they did, why they did it, and what they might do differently next time.
A good review guides the group through a clear structure:
Reconstruct the experience: ask participants to describe what happened from their perspective, ensuring all voices are heard and the group builds a shared picture of events.
Identify behaviours and patterns: highlight moments where communication broke down or worked well, and explore how decisions were made, how roles emerged, and what assumptions shaped the interaction.
Surface the impact: help participants link those behaviours to the outcome, for example, how clarity, listening, and pacing affected the accuracy of the build.
Draw out transferable insights: connect the discussion to real workplace dynamics such as briefing processes, project handovers, or working with incomplete information.
Plan an alternative approach: encourage each participant to articulate one behaviour they want to try differently on the next run.
A well-facilitated review sets up the second attempt to be substantially more deliberate and self-aware. When the group tries a new model with these fresh intentions in mind, they can observe the effects of different behaviours in real time.
This is where genuine, lasting learning occurs.
Step 10: Repeat the activity
After the first attempt and structured review, participants have a clear sense of what they want to do differently and why, but without a second attempt, those insights remain theoretical. A repeat round provides the essential “test” phase of experiential learning: a chance to apply new behaviours and see in real time what difference they make.
Using a different model is crucial here - see our 3x Lego models in the next section - because if the group already knows the target build, the challenge disappears and the value of communication, clarity, and role coordination drops.
The second attempt is likely to feel more intentional, calmer, and more collaborative. Participants will be comparing their experiences across both rounds, evaluating what improved, and identifying which behaviours helped or hindered progress.
This is what turns a fun exercise into lasting, transferable learning.
Get your FREE Lego Challenge resources - just one click
Which Models to Use for the Lego Challenge?
Looking to run the Lego Challenge team building activity but not sure what models to use? We’ve designed three Lego models of varying complexity, all perfectly suited to the activity.
For each model you’ll find:
An image of the completed model to use for the schematic
Downloadable instructions on how to build it
A list of the bricks required that you can plug into Bricklink or similar to order them
The rough cost per model (per Bricklink prices at time of writing)
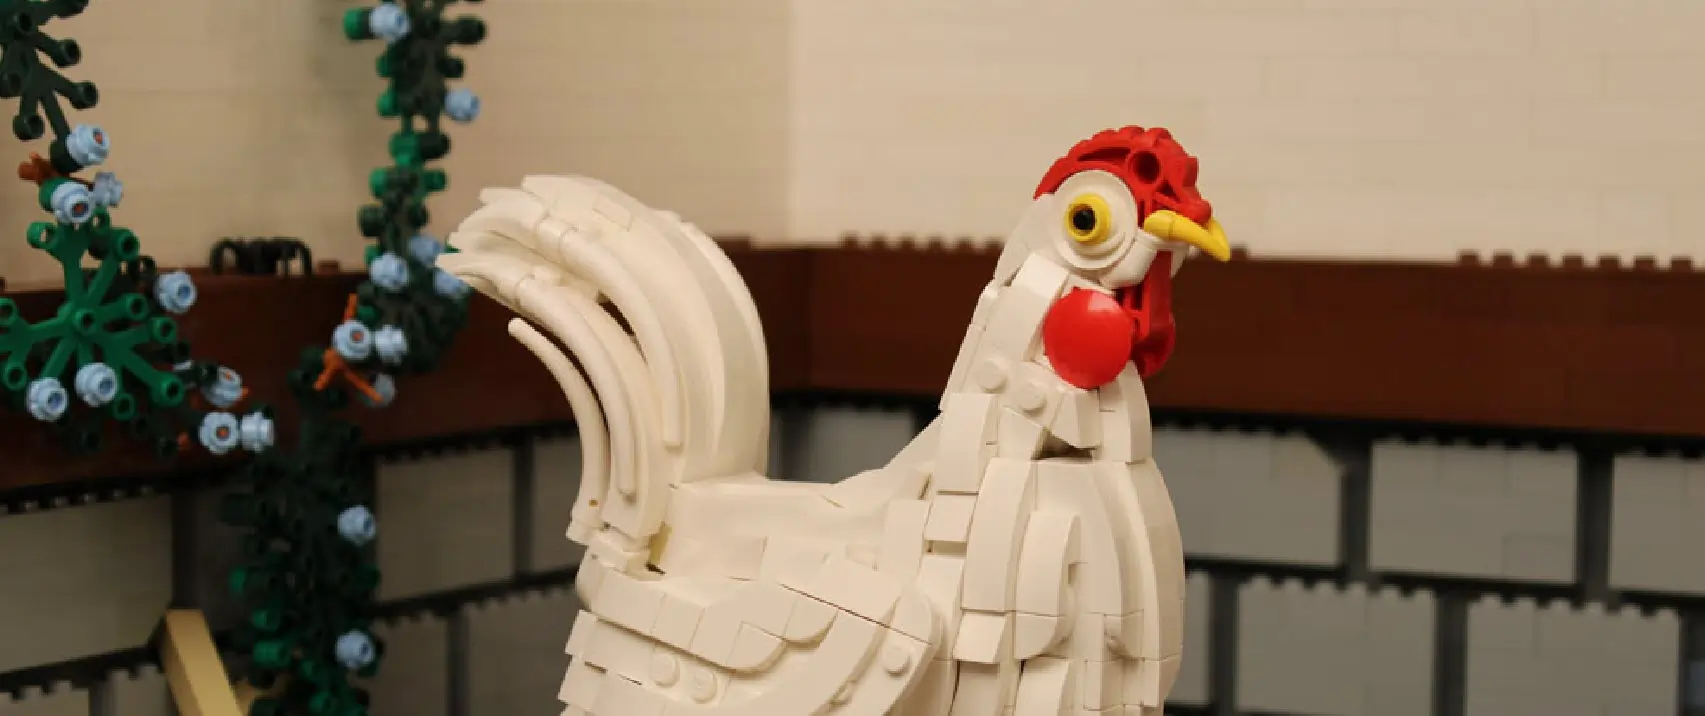
Easy Lego Challenge model: Lego Chicken
Part types required: 13
Total bricks: 17
Rough cost: £1-2 per model
Download instructions for the Lego Chicken model here.
Google “Lego Chicken Challenge” and you’ll see that many variations of the activity use a chicken model by default, so our chicken pays homage to this great tradition.
The red plate representing the Chicken’s feet is the most logical starting point for this model, but Lead Developers may be tempted to work their way down from the top (or take a completely different approach altogether). The angled blocks might cause a bit of confusion as well.
Download instructions for the Lego Chicken model here.
Medium Lego Challenge model: Lego Plumber
Part types required: 17
Total bricks: 56
Rough cost: £5-10
Download instructions for the Lego Plumber model here.
Although this model is more complex than The Chicken, it’s built entirely from common blocks meaning you might be able to pull the blocks together without buying any new ones.
The Plumber is great for the Lego Challenge because he’s 2D and built in layers. A strategic Lead Developer will try their best to communicate each layer in order, after which it’s just a case of correctly positioning the blocks in subsequent layers.
Download instructions for the Lego Plumber model here.
Hard Lego Challenge model: Lego Hedgehog
Part types required: 14
Total bricks: 39
Rough cost: £2.50-4 per model
Download instructions for the Lego Hedgehog model here.
While the Hedgehog contains fewer bricks than the Plumber, we only recommended this model for advanced groups where you’re fairly confident the Lead Developer will be able to effectively communicate complex instructions to the other Developers.
Download instructions for the Lego Hedgehog model here.
Want us to design you a bespoke model to reflect your company branding? Get in touch.
Alternative Lego Team building activities (icebreaker, quick, remote, creative, competitive)
Looking for quick and easy Lego team building activities for other contexts? Here are some suggestions:
Lego team building icebreaker: give each person 5-10 random bricks and 60 seconds to build an object that represents something about themselves, then share with the group.
Quick Lego team building activity: in pairs, one person describes a tiny hidden model for the other to build in under three minutes - perfect for warming up communication skills.
Remote Lego team building activity: everyone builds a small model off-camera, then gives verbal instructions for others to recreate it without showing the original until the end.
Creative Lego team building activity: set a loose brief (e.g., “build your ideal workspace” or “design a future invention”) and let teams explain the thinking behind their creations.
Competitive Lego team building activity: provide identical sets of bricks and challenge teams to build the tallest free-standing structure within five minutes; highest structure that stays upright wins.
Alternative team building activities
The Lego Challenge is great, but it’s by far from the best team building activity. Here we’ve rounded up a handful of alternatives to foster teamwork and collaboration in your teams.
Experiential Learning Kit - The Culprit
In The Culprit, participants take on the role of detectives on a tough murder case. Pressure is high, and in order to solve the case, effective collaboration is required. Participants collect and evaluate clues, all while exploring and improving their ability to work in a team.
We offer The Culprit as a physical experiential learning kit, or if you’re looking for virtual team building activities, it’s also available to rent or buy on MTa VELA, our online experiential learning platform.
Experiential Learning Kit - MTa Insights
With an expansive range of activities and full facilitator guidance materials, this kit is able to create lasting behavioural change amongst participants. Unlike the Lego Challenge which has limited applicability in professional settings, each of these activities has been designed and refined to put the learner at the centre of the process.
Learn more about MTa Insights here or watch our video:
Experiential learning activity for team building: Back to Back
This MTa Insights activity achieves what the Lego Challenge claims to achieve, in that effective two-way verbal communication is required, along with other crucial team-building skills like appreciating and working with others' restrictions, giving and receiving clear instructions, and appreciation of the bigger picture.
The Egg Drop Challenge
In the Egg Drop Challenge teams design and build a structure to prevent an egg from breaking when dropped from height. It’s effective for exploring problem-solving, rapid prototyping, and managing constraints, as well as team roles under time pressure. The activity naturally generates diverse ideas and encourages iteration.
However, without structured review it can skew heavily toward frantic construction rather than thoughtful collaboration, and some teams may fixate on “winning” the drop rather than reflecting on their approach.
Read our Egg Drop Challenge blog post.
The Paper Bridge Challenge
The Paper Bridge Challenge tasks teams with constructing a bridge using only paper and limited materials, capable of supporting as much weight as possible. It’s excellent for encouraging resourcefulness, iterative design, and careful planning, as the constraints push teams to think structurally rather than defaulting to instinctive solutions.
The activity naturally suits a facilitative approach where teams compare designs, test assumptions, and refine strategies. A potential drawback is that some groups may jump straight into building without aligning on goals or criteria, reducing the learning value unless guided through a structured review.
Read our Paper Bridge Challenge blog post.
The Marshmallow Challenge
In the Marshmallow Challenge, teams compete to build the tallest free-standing structure using spaghetti, marshmallow, tape, and string. The activity highlights the importance of early testing, embracing uncertainty, and learning through experimentation rather than assuming a fixed plan will work.
Its simplicity makes it accessible and energising, but the competitive framing can overshadow reflective learning unless the facilitator deliberately slows the group down to examine behaviours, and the activity often favours speed over deeper communication unless properly scaffolded.
Read our Marshmallow Challenge blog post.
Conclusion
The Lego Challenge team building activity is popular for a reason: it’s easy to run, it’s fun, and it claims to deliver good learning outcomes.
But to really achieve lasting learning, you need to facilitate the activity properly: structured review, and at least one repeat attempt.
For facilitators looking to take their teams’ learning further, there are many alternative team building activities designed to deliver impactful, lasting learning. To find more about how our experiential learning kits and activities can help you achieve your goals, book a call or get in touch now.
Written by
Jamie Thompson
Head Facilitator and Managing Director at MTa Learning
Jamie is passionate about inspiring and developing people through experiential learning. With an engaging, empowering and creative approach, he's trained over 1,000 facilitators and trainers from 37 countries through the MTa Masterclass. The creative activities developed by MTa Learning are now used in over 100 countries by thousands of the world's leading organisations including as Emirates Airlines, Amazon, Nissan, and Verizon USA. Jamie pairs his passion and experience with an impressive corporate and academic background, having started out at Deloitte before joining MTa, and now serving as a Leader in Residence and Guest Lecturer at Leeds University Business School.
